안녕하세요
esp32 cam으로 ai 사물인식 카메라를 간단하게 만들어 봅시다.
esp32 cam을 아두이노로 설정하는 방법은 아래 포스팅을 참고해주세요
https://ruminz.tistory.com/172
아두이노로 ESP32 CAM 다루기
안녕하세요 아두이노로 esp32 cam을 다뤄 봅시다. esp32 cam esp32 cam이란 espressif에서 만든 와이파이랑 블루투스가 지원되는 카메라 모듈입니다. espressif 사이트 들어가면 다음과 같이 나와 있습니다. E
ruminz.tistory.com
그리고 본 포스팅은 아래 포스팅을 참고하였습니다.
https://www.survivingwithandroid.com/esp32-cam-tensorflow-js/
How to use ESP32-CAM with Tensorflow.js
How to use Tensorflow.js with ESP32-CAM to classify images. The machine learning models run on the user browser using the image captured by ESP32-CAM
www.survivingwithandroid.com
esp32 cam 은 와이파이랑 블루투스가 되는 cam입니다.
여기선 와이파이를 이용하겠습니다.
esp32 cam에 아두이노 코딩을 업로드하는법을 알고 있는 상황으로 가정하겠습니다.
각 단계는
1.브라우저에서 ts.html 페이지를 요청하는 esp32 cam 웹 서버에 연결합니다.
2. esp32-cam은 Tensorflow.js를 실행하기 위한 모든 HTML 및 자바스크립트 코드가 포함된 ts.html 페이지를 제공합니다.
3. 사용자는 캡처된 이미지를 다시 보내는 esp32-cam으로 요청을 보내는 캡처 이미지를 클릭합니다.
4. Tensorflow.js모델은 사용자 브라우저에서 실행되고 캡처된 이미지를 분류합니다.
따라서 최종적으로 esp32 cam은
비디오 스트리밍
이미지 캡처
Tensorflow.js 기계 학습 모델을 실행하는 브라우저에 표시될 HTML 페이지를 제공합니다.
먼저 HTML코드를 작성합니다.
HTML 소스코드 편집기는 메모장으로 해도 상관없지만
저는 ATOM이라는 편집기 프로그램을 추천합니다.
다음과 같이 작성해주세요
<!DOCTYPE html>
<html lang="en">
  <head>
    <meta charset="UTF-8">
    <meta name="viewport" content="width=device-width, initial-scale=1.0">
    <title>ESP32-CAM TensorflowJS</title>
    <style>
    body {
    font-family: 'PT Sans', sans-serif;
    background-color: #dde2e1;
    margin: 0;
    color: #636060;
    line-height: 1.6;
    }
    a {
    text-decoration: none;
    color: #ccc;
}
    h2 {
    display: block;
    font-size: 1.17em;
    margin-block-start: 1em;
    margin-block-end: 1em;
    margin-inline-start: 0px;
    margin-inline-end: 0px;
    font-weight: bold;
    }
    .container {
    max-width: 1180px;
    text-align: center;
    margin: 0 auto;
    padding: 0 3rem;
    }
    .btn {
    padding: 1rem;
    color: #fff;
    display: inline-block;
    background: red;
    margin-bottom: 1rem;
    }

    </style>
    <script src="https://cdn.jsdelivr.net/npm/@tensorflow/tfjs"> </script>
    <script src="https://cdn.jsdelivr.net/npm/@tensorflow-models/mobilenet"> </script>
    <script language="javascript">


        function classifyImg() {
           const img = document.getElementById('img1');
           const r = document.getElementById('results');
           r.innerHTML = '';

           console.log("Classify...");
           img.crossorigin = ' ';
           img.onload = function() {
                console.log('Wait to load..');
                mobilenet.load().then(model => {
                // Classify the image.
                model.classify(img).then(predictions => {
                  for (i in predictions) {
                    r.innerHTML = r.innerHTML + '<b>' + predictions[i].className + "</b> - " + predictions[i].probability + "<br/>";
                    img.onload = null;
                    img.src = 'http://본인의 아이피:81';
                  }

                });

               });
           }
           img.src = 'http://본인의 아이피/capture?t=' + Math.random();
        }
    </script>

   </head>
   <body>
     <div class="container">
     <h2>TensorflowJS with ESP32-CAM</h2>
     <section>
       <img id="img1" width="320" height="200" src='http://본인의 아이피:81' crossorigin style="border:1px solid red"/>
       <div id="results"/>
     </section>
     <section>
       <a href="#" class="btn" onclick="classifyImg()">Classify the image</a>
      </section>
      <section id="i" />
   </div>
   </body>
</html>
여기서 중요한건 무조건
본인의 아이피를 입력해주세요
여기서 아이피는 ESP32 CAM을 실행하고 아이피를 부여받았을 때
그때 아이피를 써주시면 됩니다.
여기서 텐서플로우라는 라이브러리를 쓰는데요
텐서 플로우란 주로 딥러닝 분야에서 쓰는 라이브러리입니다. 구글에서 만들었고요
여기서는 이미지 인식 딥러닝을 썼습니다.
아두이노 코드는 다음과 같습니다.
#define CAMERA_MODEL_AI_THINKER
#include <Arduino.h>
#include <WiFi.h>
#include "esp_http_server.h"
#include "esp_timer.h"
#include "esp_camera.h"
#include "img_converters.h"
#include "Arduino.h"
#include "camera_pins.h"
#include "page.h"
#define PART_BOUNDARY "123456789000000000000987654321"

static const char* _STREAM_CONTENT_TYPE = "multipart/x-mixed-replace;boundary=" PART_BOUNDARY;
static const char* _STREAM_BOUNDARY = "\r\n--" PART_BOUNDARY "\r\n";
static const char* _STREAM_PART = "Content-Type: image/jpeg\r\nContent-Length: %u\r\n\r\n";

httpd_handle_t camera_httpd = NULL;
httpd_handle_t stream_httpd = NULL;


const char* ssid = "본인의 공유기  아이디";
const char* password = "본인의 공유기 비밀번호";

static esp_err_t capture_handler(httpd_req_t *req){
    Serial.println("Capture image");
    camera_fb_t * fb = NULL;
    esp_err_t res = ESP_OK;
    fb = esp_camera_fb_get();
    if (!fb) {
        Serial.println("Camera capture failed");
        httpd_resp_send_500(req);
        return ESP_FAIL;
    }
    httpd_resp_set_type(req, "image/jpeg");
    httpd_resp_set_hdr(req, "Content-Disposition", "inline; filename=capture.jpg");
    httpd_resp_set_hdr(req, "Access-Control-Allow-Origin", "*");

    res = httpd_resp_send(req, (const char *)fb->buf, fb->len);
    esp_camera_fb_return(fb);
    return res;
}
static esp_err_t page_handler(httpd_req_t *req) {
    httpd_resp_set_type(req, "text/html");
    httpd_resp_set_hdr(req, "Access-Control-Allow-Origin", "*");
    httpd_resp_send(req, page, sizeof(page));
}
static esp_err_t stream_handler(httpd_req_t *req){
    camera_fb_t * fb = NULL;
    esp_err_t res = ESP_OK;
    size_t _jpg_buf_len = 0;
    uint8_t * _jpg_buf = NULL;
    char * part_buf[64];

    res = httpd_resp_set_type(req, _STREAM_CONTENT_TYPE);
    if(res != ESP_OK){
        return res;
    }
    httpd_resp_set_hdr(req, "Access-Control-Allow-Origin", "*");
    while(true){
        fb = esp_camera_fb_get();
        if (!fb) {
            Serial.println("Camera capture failed");
            res = ESP_FAIL;
        } else {

                if(fb->format != PIXFORMAT_JPEG){
                    bool jpeg_converted = frame2jpg(fb, 80, &_jpg_buf, &_jpg_buf_len);
                    esp_camera_fb_return(fb);
                    fb = NULL;
                    if(!jpeg_converted){
                        Serial.println("JPEG compression failed");
                        res = ESP_FAIL;
                    }
                } else {
                    _jpg_buf_len = fb->len;
                    _jpg_buf = fb->buf;
                }
             }
        if(res == ESP_OK){
            res = httpd_resp_send_chunk(req, _STREAM_BOUNDARY, strlen(_STREAM_BOUNDARY));
        }
        if(res == ESP_OK){
            size_t hlen = snprintf((char *)part_buf, 64, _STREAM_PART, _jpg_buf_len);
            res = httpd_resp_send_chunk(req, (const char *)part_buf, hlen);
        }
        if(res == ESP_OK){
            res = httpd_resp_send_chunk(req, (const char *)_jpg_buf, _jpg_buf_len);
        }
        if(fb){
            esp_camera_fb_return(fb);
            fb = NULL;
            _jpg_buf = NULL;
        } else if(_jpg_buf){
            free(_jpg_buf);
            _jpg_buf = NULL;
        }
        if(res != ESP_OK){
            break;
        }
    }
    return res;
}
void startCameraServer(){
    httpd_config_t config = HTTPD_DEFAULT_CONFIG();
    httpd_uri_t index_uri = {
        .uri       = "/",
        .method    = HTTP_GET,
        .handler   = stream_handler,
        .user_ctx  = NULL
    };
    httpd_uri_t page_uri = {
        .uri       = "/ts",
        .method    = HTTP_GET,
        .handler   = page_handler,
        .user_ctx  = NULL
    };
    httpd_uri_t capture_uri = {
        .uri       = "/capture",
        .method    = HTTP_GET,
        .handler   = capture_handler,
        .user_ctx  = NULL
    };

    Serial.printf("Starting web server on port: '%d'\n", config.server_port);
    if (httpd_start(&camera_httpd, &config) == ESP_OK) {
        httpd_register_uri_handler(camera_httpd, &capture_uri);
        httpd_register_uri_handler(camera_httpd, &page_uri);
    }
    // start stream using another webserver
    config.server_port += 1;
    config.ctrl_port += 1;
    Serial.printf("Starting stream server on port: '%d'\n", config.server_port);
    if (httpd_start(&stream_httpd, &config) == ESP_OK) {
        httpd_register_uri_handler(stream_httpd, &index_uri);
    }
}
void setup() {
  Serial.begin(115200);
  Serial.setDebugOutput(true);
  Serial.println();
  camera_config_t config;
  config.ledc_channel = LEDC_CHANNEL_0;
  config.ledc_timer = LEDC_TIMER_0;
  config.pin_d0 = Y2_GPIO_NUM;
  config.pin_d1 = Y3_GPIO_NUM;
  config.pin_d2 = Y4_GPIO_NUM;
  config.pin_d3 = Y5_GPIO_NUM;
  config.pin_d4 = Y6_GPIO_NUM;
  config.pin_d5 = Y7_GPIO_NUM;
  config.pin_d6 = Y8_GPIO_NUM;
  config.pin_d7 = Y9_GPIO_NUM;
  config.pin_xclk = XCLK_GPIO_NUM;
  config.pin_pclk = PCLK_GPIO_NUM;
  config.pin_vsync = VSYNC_GPIO_NUM;
  config.pin_href = HREF_GPIO_NUM;
  config.pin_sscb_sda = SIOD_GPIO_NUM;
  config.pin_sscb_scl = SIOC_GPIO_NUM;
  config.pin_pwdn = PWDN_GPIO_NUM;
  config.pin_reset = RESET_GPIO_NUM;
  config.xclk_freq_hz = 20000000;
  config.pixel_format = PIXFORMAT_JPEG;

  // if PSRAM IC present, init with UXGA resolution and higher JPEG quality
  //                      for larger pre-allocated frame buffer.
  if(psramFound()){
    config.frame_size = FRAMESIZE_QVGA;
    config.jpeg_quality = 10;
    config.fb_count = 2;
  } else {
    config.frame_size = FRAMESIZE_QVGA;
    config.jpeg_quality = 12;
    config.fb_count = 1;
  }
#if defined(CAMERA_MODEL_ESP_EYE)
  pinMode(13, INPUT_PULLUP);
  pinMode(14, INPUT_PULLUP);
#endif
  // camera init
  esp_err_t err = esp_camera_init(&config);
  if (err != ESP_OK) {
    Serial.printf("Camera init failed with error 0x%x", err);
    return;
  }
  sensor_t * s = esp_camera_sensor_get();
  // initial sensors are flipped vertically and colors are a bit saturated
  if (s->id.PID == OV2640_PID) {
    s->set_vflip(s, 1); // flip it back
    s->set_brightness(s, 1); // up the brightness just a bit
    s->set_saturation(s, -2); // lower the saturation
  }
  // drop down frame size for higher initial frame rate
  s->set_framesize(s, FRAMESIZE_QVGA);
#if defined(CAMERA_MODEL_M5STACK_WIDE)
  s->set_vflip(s, 1);
  s->set_hmirror(s, 1);
#endif
  WiFi.begin(ssid, password);
  while (WiFi.status() != WL_CONNECTED) {
    delay(500);
    Serial.print(".");
  }
  Serial.println("");
  Serial.println("WiFi connected");
  startCameraServer();
  Serial.print("Camera Ready! Use 'http://");
  Serial.print(WiFi.localIP());
  Serial.println("' to connect");
}
void loop() {
  // put your main code here, to run repeatedly:
  delay(10);
}
여기서 page.h를 가져와야 됩니다.
https://pastebin.com/embed_iframe/PAhx4PH4
이 사이트에 들어가면 page.h코드가 뜹니다.
그대로 옮겨서 자신의 소스코드가 있는 파일에 붙여 넣어 줍시다.
그리고 camera_pins.h를 가져와야 됩니다. 이건 파일 -> 예제 -> esp32 -> camera ->cameraWebserver
를 보시면

camera_pins.h파일이 있습니다.

이 파일을 그대로 가져와 자신의 소스코드 있는 부분에 넣어주세요
그럼 준비는 다됐습니다. 이제 업로드를 실행시켜주세요
업로드가 다 진행되었다면
시리얼 모니터를 키신 후
esp 32 cam 리셋 버튼을 눌러주세요

다음과 같이 아이피 주소가 떴다면
이제 아까 작성하신 html 파일을 열어주세요
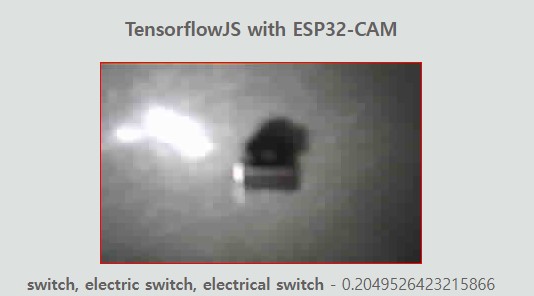
브레드보드에 쓰는 택트 스위치인데
스위치로 나오네요
근데... 카메라 성능이 너무 안 좋아서 그런지 인식을 잘 못합니다...
그래도 기능은 대충 알았으니 이 정도면 됐네요
'Coding > Arduino' 카테고리의 다른 글
| 아두이노 써미스터 온도센서 DM440 다루기 (0) | 2022.07.06 |
|---|---|
| base64란 무엇인가 아두이노 실습으로 알아보자 (0) | 2022.07.04 |
| 아두이노로 ESP32 CAM 다루기 (0) | 2022.06.28 |
| 아두이노 Esp8266 시리즈 esp01로 와이파이 연결하기 (0) | 2022.06.27 |
| 아두이노 Wemos D1 R1 공공데이터 가져오기 (0) | 2022.06.27 |