안녕하세요 반갑습니다.
아두이노 Wemos D1 R1 제품으로 간단한 iot 제품을 구현해봅시다.
Wemos R1 D1
Wemos R1 D1은 이렇게 생겼습니다.

시중에서 4~5천 원 정도 하는 거 같네요
이 제품은 5핀 케이블을 써야 됩니다.
5핀 to usb 케이블로 컴퓨터랑 연결해주세요 그런 다음 아두이노 IDE를 켭시다.
아두이노를 키면 세팅해야 될 게 있습니다.
파일 -> 환경설정에 들어가주세요
http://arduino.esp8266.com/stable/package_esp8266com_index.json을
추가적인 보드 매니저 URLs에 입력해줍시다.
툴 -> 보드 -> 보드 매니저를 눌러주세요
ESP8266를 검색하고 설치해주세요
보드는 LONIN(WeMos) D1 R1로 설정해주세요
그런 다음 아래의 코드를 입력해주세요
/*
    This sketch demonstrates how to set up a simple HTTP-like server.
    The server will set a GPIO pin depending on the request
      http://server_ip/gpio/0 will set the GPIO2 low,
      http://server_ip/gpio/1 will set the GPIO2 high
    server_ip is the IP address of the ESP8266 module, will be
    printed to Serial when the module is connected.
*/

#include <ESP8266WiFi.h>

#ifndef STASSID
#define STASSID "본인의 와이파이 아이디"
#define STAPSK  "본인의 와이파이 비밀번호"
#endif

const char* ssid = STASSID;
const char* password = STAPSK;

// Create an instance of the server
// specify the port to listen on as an argument
WiFiServer server(80);
void setup() {
  Serial.begin(115200);

  // prepare LED
  pinMode(13,OUTPUT);
  digitalWrite(13, 0);

  // Connect to WiFi network
  Serial.println();
  Serial.println();
  Serial.print(F("Connecting to "));
  Serial.println(ssid);

  WiFi.mode(WIFI_STA);
  WiFi.begin(ssid, password);

  while (WiFi.status() != WL_CONNECTED) {
    delay(500);
    Serial.print(F("."));
  }
  Serial.println();
  Serial.println(F("WiFi connected"));

  // Start the server
  server.begin();
  Serial.println(F("Server started"));

  // Print the IP address
  Serial.println(WiFi.localIP());
}

void loop() {
  // Check if a client has connected
  WiFiClient client = server.available();
  if (!client) {
    return;
  }
  Serial.println(F("new client"));

  client.setTimeout(5000); // default is 1000

  // Read the first line of the request
  String req = client.readStringUntil('\r');
  Serial.println(F("request: "));
  Serial.println(req);

  // Match the request
  int val;
  if (req.indexOf(F("/gpio/0")) != -1) {
    val = LOW;
  } else if (req.indexOf(F("/gpio/1")) != -1) {
    val = HIGH;
  } else {
    Serial.println(F("invalid request"));
    val = digitalRead(13);
  }

  // Set LED according to the request
  digitalWrite(13, val);

  // read/ignore the rest of the request
  // do not client.flush(): it is for output only, see below
  while (client.available()) {
    // byte by byte is not very efficient
    client.read();
  }

  // Send the response to the client
  // it is OK for multiple small client.print/write,
  // because nagle algorithm will group them into one single packet
  client.print(F("HTTP/1.1 200 OK\r\nContent-Type: text/html\r\n\r\n<!DOCTYPE HTML>\r\n<html>\r\nGPIO is now "));
  client.print((val) ? F("high") : F("low"));
  client.print(F("<br><br>Click <a href='http://"));
  client.print(WiFi.localIP());
  client.print(F("/gpio/1'>here</a> to switch LED GPIO on, or <a href='http://"));
  client.print(WiFi.localIP());
  client.print(F("/gpio/0'>here</a> to switch LED GPIO off.</html>"));

  // The client will actually be *flushed* then disconnected
  // when the function returns and 'client' object is destroyed (out-of-scope)
  // flush = ensure written data are received by the other side
  Serial.println(F("Disconnecting from client"));
}
입력하는데 번거롭다면 위의 파일을 다운로드해서 복사 붙여 넣기를 진행해주세요
여기서
#define STASSID "본인의 와이파이 이름"
#define STAPSK "본인의 와이파이 비밀번호"
라고 적어놨는데 본인의 와이파이 아이디, 본인의 와이파이 비밀번호를 입력해주세요
그리고 업로드를 해주고 시리얼 모니터를 켜줍시다.
그럼 시리얼 모니터에 자신의 와이파이가 나옵니다.
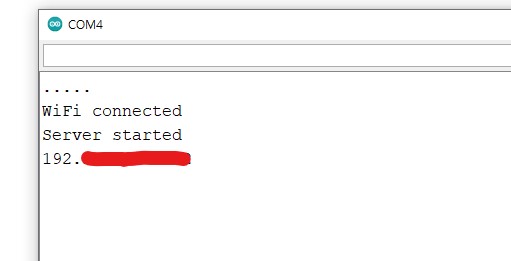
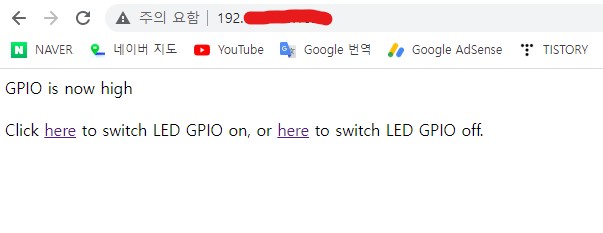
이 와이파이를 웹브라우저에 입력해주세요
그럼 아래와 같은 화면이 나옵니다.
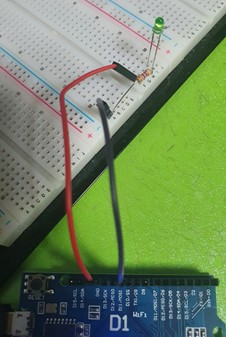
그다음 브레드보드와 점퍼선을 가지고 다음과 같이 회로를 구성해주세요
그다음 자신의 아이피 웹사이트로 들어간다음
here부분을 클릭해줍시다. led가 꺼졌다 켜졌다를 반복합니다.

'Coding > Arduino' 카테고리의 다른 글
| 아두이노 16X2 LCD 제어하기 (0) | 2022.06.20 |
|---|---|
| 아두이노 적외선 라인트레이서 hw-511 사용법 (0) | 2022.06.17 |
| 아두이노 압력센서 값 얻어오기 (0) | 2022.06.15 |
| 아두이노 서보모터(sg90) 제어하기 (0) | 2022.06.15 |
| 아두이노 LED 켜기 (0) | 2022.06.15 |